Wednesday, August 31, 2011

Inspiration from an Old Friend, Pt.3

The project progresses, sometimes quickly, sometimes slowly. But I'm having fun, and that's all that matters.

Here are some shots of the rail dock. I took a left-over window section, trimmed away everything but the brick detail, and shortened it to create a walk-through archway. The rest of the interior I covered with V-groove sheet to represent wooden boards. I just need to add some crates and boxes to complete this scene, though I may add some internal lighting to accent it.


Art scratch built a motorized roll-up door out of scraps of the corrugated awnings for this side of the boiler room addition. Remember, he was holding himself to only using the kit parts, as well as using all of the kit parts. Also remember, I am not holding myself to that. ( In spite of that, I haven't strayed too far from Art's concept.)  I have some nice doors, but I felt the four panels were too wide, so I narrowed it to three. I also laminated some scraps of styrene, then carved and puttied them to represent a quick and dirty asphalt threshold.


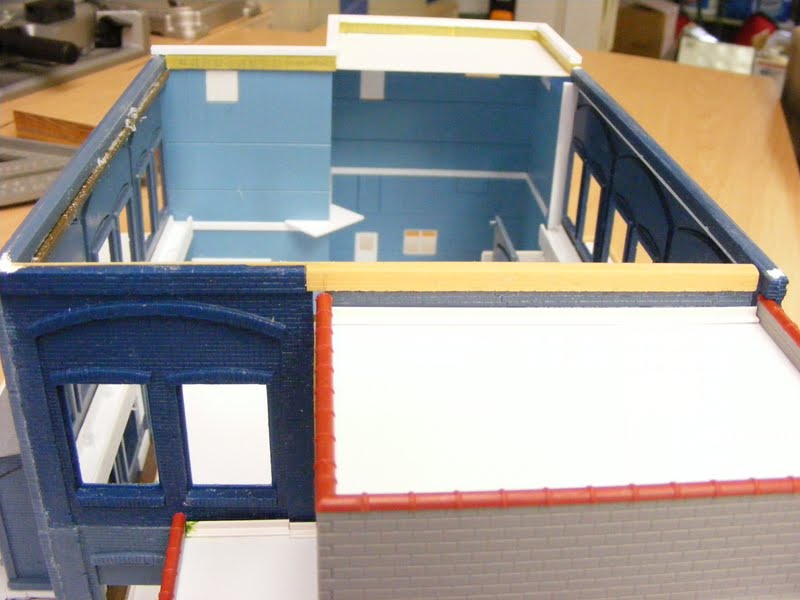
We'll be jumping around a bit now. Here I finished off the inside roof walls under the capstone.


Remember when I did the initial cuts of the long wall and was left with that small sliver from the top?  Here it is glued to the back of the top of the long wall. The styrene strip is between the front and rear so it sits plumb. Here it is on the rear wall.


The front wall with that brick strip not yet added. Not yet added because the wall was not straight. While the 'H' beam reinforced the joint well enough, it couldn't remove the warp in the wall. (Warped parts, a fairly common occurrence in older kits.)  Two rectangular brass tubes CA'ed to the top and bottom did remove the warp.


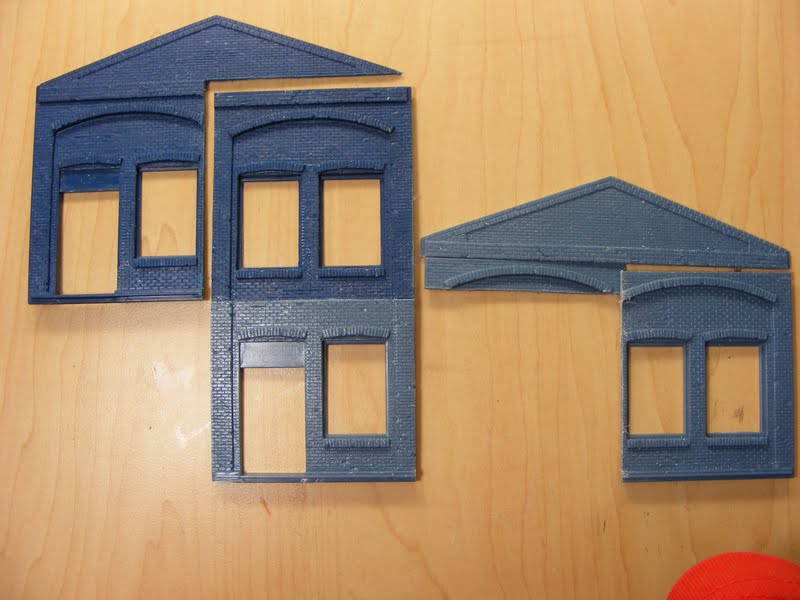
The annex needs a roof. Art just used a plain piece of styrene, but I thought the kit's roof had a lot of nice detail. (Have I mentioned the foundation made out of strip styrene previously?  If not, let me mention the foundation made out of strip styrene.)


The roof with  the cut line. Notice it is to the right of seam. This will yield two pieces to make the new roof.


The roof pieces were too thick for me, especially when viewed from the side. (The roof was this thick because it had to be self-supporting on the original kit, and the thickness was hidden by brickwork anyway.)  To make a more prototypical thickness, I usually bevel the exposed edges to create a thinner profile. This time I thought I'd try something different. I scribed a line on the two exposed edges of both pieces, then carefully cut into the side with a razor saw.  This time I used the Zona saw instead of the small one, the longer Zona giving me more control for a straight line. When the cut was deep enough, I removed the strip from underneath. Here we have the initial cut on the right, with the second cut on the left.


Remember the seam I left on, there it is in the middle, attached to the left-hand piece. This makes the panels all the same size with a seam between each. Didn't need a seam on the outside right edge, so I removed it. A piece of .010 x .125 strip at the top gives me a 'lead' flashing, as well as hiding the small gap between the roof and the main wall.


Here are some shots of the relative placement of the walls. At this point the front wall, including the side wall on the right, has been glued to the new addition on the left. The back wall with loading dock, and the block addition with boiler room remain independent.


Here is where I found myself in a quandary. I needed to have those three sub-assemblies separate for painting purposes, but I needed a way to attach them to each other securely to finish adding the roof details. I guess I need a base. Here I've cut a piece of .040 sheet styrene 12" x 18," large enough to give plenty of space around all the sides.  I placed the front and sides where I thought I had a balanced look, and marked the position of the front right corner (on the inside). From that point I struck two lines perpendicular to each other and parallel to the sides. (When I cut the base I was careful to make sure I was parallel front to back and side to side, with four 90° corners.)  Then I glued two thick strips of styrene, the lengths of the two walls, along those lines. They would register the placement of the walls, while keeping everything straight and square.


Once the glue had dried, I slid the front wall against the strip, and marked the inside left corner. From there I struck another perpendicular line. I glued another strip along it.


It's a little hard to see, but here are the strips glued to the base.


OK, here we go! This is my favorite hobby within a hobby, masking. I find masking more relaxing than making hot metal ladles. I start by masking around all the edges with tape by Tamiya. I love this stuff. It comes in three widths, and leaves very crisp lines.


Tamiya's tape is fairly expensive, so once I had outlined everything, I filled in all the other spaces with 3M's Blue Painter's Tape (the new lo-tack formula).  The reason I went to all this trouble is I really like the color of the Pikestuff addition. I'll leave it the original blue and just weather it.


At the other end, I had to use some cuts from the Weekly Herald kit to extend the wall behind the block addition. Because I now had all the walls registered with the base, I knew exactly how long that piece needed to be.


Since there would be a railroad spur right next to the building, a railing was added for safety.


An interior view showing more of the pieces from the Weely Herald.


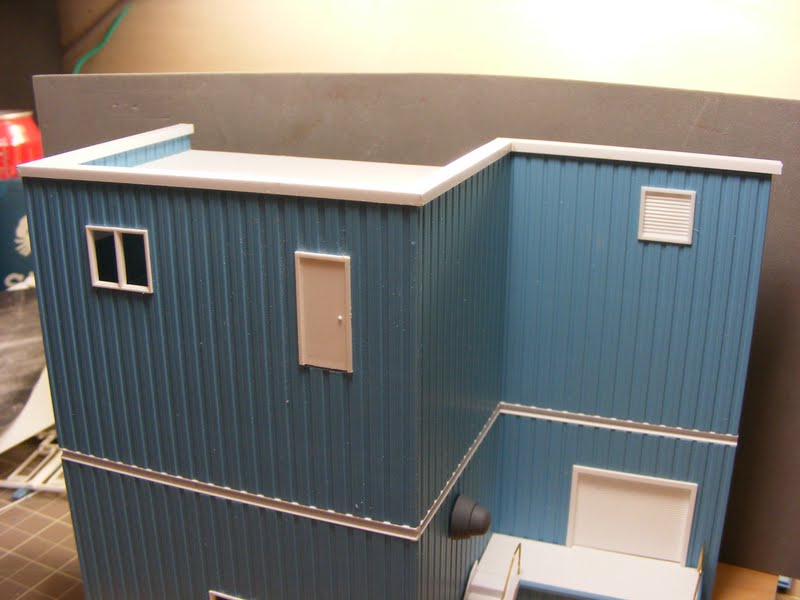
Two final shots showing progress to date.


Next time we'll be primed, if not painted. See you then.   Don

Friday, August 26, 2011

Inspiration from an Old Friend, Pt.2

First, let me show you how I finished the Pikestuff side. I enlarged the opening so the roll-up door would fit, and I added a concrete cap to the roof made of styrene strip.


Now on to the middle, old section of the building. It is made from the  classic Superior Bakery kit. The bakery is a single-story structure, and these are the two long walls from the kit. These are the cuts needed to assemble them into one two-story wall (hence the need for two kits).  Let me make a few comments here. Art's projects usually required a lot of razor saw cuts, and this one is particularly cut-intensive. If you didn't have saw skills when you started this bash, you definitely had them when you finished. Also, older model kits (and one of these was produced in 1962) were made of styrene that was harder and more brittle than is produced today, and in this case, thicker as well. This part of the project really took some time and effort.


Here the two pieces are glued together. What's that, you ask? Is there something wrong with my camera? Did I use different lights?   No, your eyes are not playing tricks on you, this wall is made of a lighter shade of plastic. This wall was made from the Revell kit from '62, while the darker walls are from a Con-Cor kit made in the '80s. Art's kits were both dark blue, which contrasts nicely with the light blue of the Pikestuff addition. I'll probably go with the darker blue as well.

Something else to mention here. The two-window section on the lower right from the electrical box to the plain wall is a separate piece, and a fairly ill-fitting piece at that. When Revell originally made this kit, they made two others, the Weekly Herald and the Two-Stall Engine House, that used most of the same parts. The end walls were different as well as that two-window cutout. Sprues with different roof and wall details made three distinct kits that shared a common backbone.


The cuts made to two end walls to make a two-story wall. This project leaves you with a lot of spare cut-offs for other projects.


Art made a bump out section he called the Annex. This is the cutting guide for it. A whole lotta cuts.


Here the Annex is assembled and glued in place, along with the doors for it.


Now we move to the back of the building and deviation #3. Art did not have any rail service to this building, relying strictly on trucks to ship and receive. I felt a spur for an occasional boxcar would be nice. I had two wooden shipping doors from another kit that would fit and look appropriate. Time to remove that ill-fitting section that I so meticulously fit just a short time earlier.


Now I needed some matching brickwork to fill that hole and hold those doors. Let me introduce to you the front facade of the Weekly Herald. When I first started this project, I wasn't sure I would be able to secure two Superior Bakery kits, so I picked up two Weekly Herald kits to hedge my bets. They are more readily available on eBay and cheaper to boot.


The ill-fitting section removed.


With some careful cutting, I had a wall that fit and two doors that were actually even with each other.


ARE YOU AN INNIE OR AN OUTIE? Most of my loading docks are outies, like the one on the new addition. But here I thought I would have a dock that was mostly on the inside of the doors. That would require the spur (and the boxcar) to be very close to the building, providing an interesting visual detail. So I added some short sidewalls and a 'concrete' foundation. I also decided to open one of the doors and create an interior scene.


I lucked out here. I figured it would take two door castings to make the one open door. One casting where I'd trim the outer casing away, leaving just the door, and one casting where I'd junk the doors to leave the outer frame work. Fortunately, that small razor saw allowed me to cut the doors away from the frame, and salvage both.


A view from inside. I've added the side walls, and the frame to support the floor. "Why the notches?", you ask.


To clear the large 'H' beam used to stiffen the wall.


The floor, .020 scribed styrene laminated to a plain piece of .020 for thickness. You can see where I cut the ends to make individual boards. I also added the channel under the doors to support the floor. 


The view from inside, with the floor installed and the doors on.


The outside view. I still need to add lots of details to the interior walls and floor. And hinges for the doors.


The loading dock in place. A lot more to due, but I'm satisfied with the progress.


That's it for now. Let me know what you think. Don

Monday, August 22, 2011

Inspiration from an Old Friend, Pt.1

Art Curren. No, I didn't know him, but he was my favorite author at Model Railroader magazine. He was the undisputed  King of the Kit Bash. He could mold and meld simple plastic structure kits into amalgams of  marvelous modelling. (I'll try not to alliterate any further.)  He wasn't a professional modeller, he wasn't even a professional writer. He was head of Kalmbach's circulation department. But when he opened up a structure kit, he saw beyond the instructions to a building greater than the picture on the box.

Over the years, I thought I'd seen every article he had written. I even had his book, a collection of articles from MR. So imagine my delight when I ran across an article I'd never seen in an old MR from 1990. It was a factory kit bash using the classic Superior Bakery (one of his favorite starting points, along with Mt.Vernon Manufacturing, the Hotel Belvedere, and the Burlington Mills) as well as the Yard Office kit from Pikestuff (oooooh, Pikestuff). The Superior Bakery kit was originally produced by Revell back in the late '50s, sold to a series of manufacturers, finally ending up with Con-Cor/Heljan when Art bashed it in '90. Surprisingly, I had never assembled one of these kits. And while it was widely available back then, ah, not so much now. Turns out today it is a highly sought after kit. And I needed two. It took a while to get two on eBay that didn't cost an arm and a leg. The Pikestuff kit was fairly new in '90, and is still being produced today. It is an inexpensive kit, and I got one from Walthers.

The premise of this kit bash is we have a small manufacturer in a turn of the century building, who expanded to one side in a concrete block addition, and later to the other side in a corrugated metal addition.  I started with the concrete block side.


Wooo, Pikestuff concrete block, my favorite.  Since this represents an addition, I only need three walls. The long wall consists of two full-size pieces of block, plus a strip eight blocks high. These pieces are the ones I've always used, and in HO scale, are 14½'x 28'. The two side walls are narrower, 18½' in HO. I had to pick these up from Walthers. I suppose I could have just cut down the larger piece to fit, but these were so much more convenient. You can see how I braced the joints with .040 x .250 strip.


I needed to cut two openings in the long wall for a window and a shipping door. I've mentioned this razor saw before, one the size of a  #11 blade. It is sharp, stiff, and pointed, and I was able to make the cuts without drilling any pilot hole. I like this blade.


Door and window from the bakery kit. I added styrene casings around them for a better fit.


Here they are installed. Notice the .030 square strip around the window to cover small gaps.


Internal bracing to keep the walls square and secure the door.


A two block strip around the inside of the walls establish the roof line.


A simple roof of .030 styrene and some terra cotta cap tiles.


Art used the awning from the bakery kit as-is, but I felt it was too wide. In narrowing it, I had to lose the support bracket on one side. No big loss, as it didn't look good anyway, so off came the other side. Now I had to support the awning, and I used this brass wire to represent steel pipe.


The awning installed. You can see the four panels that make it up. Originally it was five wide, too wide for me. Normally in a situation such as this, I would just junk the piece and scratch a new one out of Plastruct sheet. But this was a really nice molding, and I had to use it.


A small boiler house addition on the side. I still need to add a roll-up door and smokestack, but otherwise this side of the building is mostly complete. Time to move to the other side.


The two ends of the Yard Office. One was cut so it was a scale 21' tall and the other so it was a scale 16½'.


OK, WE COME TO OUR FIRST DEVIATION!

 Let me explain the premise of this project. Art wanted to use all the parts from the kits and ONLY the parts from the kits, with the exception of  styrene sheet for the roof. I didn't hold myself to this restriction. I  have drawers full of parts, and dammit, I'm gonna use 'em. Here is where Art ran into trouble. He butt-jointed the two pieces together, figuring he would sand it so the joint would disappear. That just didn't happen, but he recovered by scribing two more joints 8' above and 8' below, representing the seams found on a real building. I considered doing that, but didn't feel  I could get a consistant scribe up and down through the corrugations. My solution was to place this styrene channel between them. In reality is should be an 'I' beam or 'H' beam, but since you won't see the inside, a channel will do. Which brings us to our second deviation. Art only had the ground level door and window, but since I was allowing myself to use other parts (stairways and railings), I added an upper floor door and window.

OOOPS, FIRST BIG SCREW-UP! I actually didn't discover the screw-up til a few more steps below, but I'll cop to it here. The two wall sections are reversed. Art had the taller section on the bottom, the smaller on top. Had I tried using his scribe method, this mistake would have been disastrous. Using the channel mitigated my faux pas. In fact, the more I looked at it, the more I felt this was the proper orientation.I think it makes the building look taller.


The windows and doors installed.


The wing wall alcove, with louvered vent and exhaust fan. I think it was here I realized my mistake. I groaned at first, then had a good laugh. It's just a model, not life and death.


The other side with its louvered vent. Pretty exciting, huh?


Art had a delivery door in the wing wall, but due to his self-imposed restriction, had no delivery dock.  I LOVE delivery docks, and had to have one. Here are the parts for mine. First I needed to cut an opening for the roll-up door. This time I roughed it out with a cutoff wheel in my Dremel, finishing up with a knife and this 90ยบ chisel for the corners. The deck is a lamination of .020 scribed sheet and .030 plain sheet. The side panels were made from the cutoffs of the walls. The rounded portion at the top of them are the gutters meant capture the roof panels of the kit (not used.........yet). Here I think they make perfect rubber bumpers.


Test fitting the dock revealed I cut the sides too short. An .020 'concrete pad' rectifies the situation.


One of the things (almost) all my docks have is a stairway down from them. Here the steps are made from thick styrene strip. I had to remove part of the 'bumper' so the steps would fit flush. Here you can see why I had to laminate the deck, to make it thick enough to go to the top of the 'bumper.'


 Here I've installed brass railings, filled in under the steps, and added flashing where the steps meet the side wall.


Another test fit. Pretty good, I just need to remove a little more at the top of the opening so the door fits perfectly.


Well I've gone on long enough now. I hope you are enjoying  my ravings, and as always, comments and questions welcome. Don