Friday, August 19, 2011

Projects B.B. (Before Blog)

I thought I might share with you some projects I started and (essentially) finished before I started this blog. Each need a few more details added,  and they need to be mounted to a base. Also, as you can see, they need to be painted (my old nemesis).

One of the ingredients of iron is limestone, and this is the Crusher for a limestone quarry. Of course, the railroads use limestone for track ballast too, so this industry will get a lot of traffic. This model is built from two Walthers' Glacier Gravel kits. I just love this kit, and have built both 'N' and 'HO' versions of it. This kit would also be at home as a coal tipple or part of a cement plant. This is the first time I've kit bashed this model, much less used two. A bit of history about this kit; Walthers based it on a scratch-built model the late Gordon Odegard made for Andy Sperandeo's Washita and Santa Fe project railroad in Model Railroader magazine.

In this shot, you are seeing close to the basic building if built as per the instructions. If you are already familiar with this kit, you will notice just a few differences here on the front side.


As we swing around the front to the left, we start to see some modifications. The unaltered kit only has one loader and room for two tracks. I've bumped out the left side to allow a second loader and a third track.


In this shot you can see there is actually room to handle four tracks of hoppers; two under the loaders, the space between them, and under the chutes on the outside of the building. This perspective shows how much has been added to the rear.


Here you can see where the four tracks will go. I added some roof cupolas and the exhaust fans on the flat  section. It is mostly sheet styrene, but the grid work is made from the fire escapes from the Burlington Mills kit.


This is a small transfer house that feeds the Crusher. Another conveyor needs to be built that will feed the cupola on the roof of the transfer house.


Now we move to another fan favorite, which you see on every coal-hauling layout featured  in magazines and posted on the web. It is Walthers' New River Mining Company, and it is a very nice kit that is easy to assemble, and has a lot of interesting roof lines. But like I said, everybody has this model on their layout, and I wanted something a little more distinctive.

I think this qualifies as "a little more distinctive." It is made from three kits, as well as Plastruct stairways and railings. I don't know if you can appreciate the sheer size of this model from these photos, but it is huge. There is actually a fairly large building that wouldn't fit in the cart that covers the side on the right.


 The other side. Damn, that's a lot of windows. I hate to glaze windows. Many (most) times I don't. But I felt a kitbash this impressive (well I think it's impressive) deserved to have it's glass installed. Besides, too much of the window detail was molded into the clear glazing to leave them off. Unfortunately, the complexity of the alterations I made required the windows to be installed before completion (painting) of the model. You can see the blue tinted windows where I applied Micro Mask to them. It is a rubbery masker that peels off easily after painting. Did I say 'peels off easily'? More like 'falls off easily'. I had forgotten that clear styrene has different characteristics than your standard styrene. Manufacturers use demolding agents on it which leave an oily residue on the surface. I should have washed the windows with a mild detergent first, but I didn't. That is why the Micro Mask fell off. Well, most of it. Looks like I'll need to tape mask the rest.


This tipple is so large, I may have trouble finding a location for it. If need be, it separates into two sections. I hope not.


I need to finish both of these projects. If not, I at least need to take some more pictures. Hope you enjoyed this. Don

Wednesday, August 17, 2011

'Nother Critter, Pt.4

This is the after-market headlight for the front of the hood. It is not identical to the one on the cab, but it's a dual unit with up/down orientation. It'll float. Besides, most critters are cobbled together in the company's diesel shops with whatever parts are available. That's my story, and I'm stickin' to it.


I added this .010 x .250" strip so the lamp would sit flush with the overhang at the top. Will eventually drill out the holes so light can shine through from inside.


The centered head light meant the grab irons had to be offset. Again, the template from BLMA let me space them perfectly.


After settling on the placement of the cab, I saw there was room for stairs instead of rungs. I marked cut lines at all four corners, and here is the first completed hole. Hmmmmm...... I need to fill that unsightly gap.


Here I've finished preparation for the steps, and filled the spaces in the deck with sheet styrene. You will notice I removed all the molded-on tread work. Like before, too much of it was damaged removing parts of the deck. This time I used a chisel blade to remove most of it first, leaving an easier sanding job. And instead of replacing it with Plastruct tread plate, I am going to use a brass, see-through tread.


Two shots showing the progress to date.


Trying to make four identical step-wells seems a little intimidating, so I've ordered some kits from Walthers. They will probably arrive in 7-10 days, so I may set this project aside til then. But don't worry, I still have plenty of things to work on.  Don

Monday, August 15, 2011

'Nother Critter, Pt.3

On the rear of the cab was a small, but annoying, gap between the roof and back wall. I covered it with this piece of .010 square stock. Kind of tricky using a strip that small, but it was worth it. If you look inside the cab you  can see where I glued two pieces of .020 x .250 styrene, to strengthen and square the cab. And probably add magnets.


Next I added the number boards and headlights. (I also added the hand rail under the window.) These headlights are spaced closely together, while the kit's are farther apart. Ooops, can't have that.


This meant I needed to plug the holes in the front . I didn't have any rod with the correct diameter, so I chucked a larger piece in my drill.


Squeeze the trigger, apply a file, and PRESTO, instant hand lathe. Work slowly and keep test fitting to the holes.


Eventually, you get a perfect fit.


Glue them in leaving them shy of the surface. Putty will make everything flush.


On the first critter, I shortened the chassis drastically. This one I'm thinking of leaving full length. I envision this one moving hot-metal cars in and out from under the blast furnace's casting floor. That's why it needs to be so short, to fit in those small confines. But no one wants to be too close to a hot-metal cars, so the longer the chassis, the happier the crew. Of course there will always be an idler car between them, and the engine will probably be radio-controlled close to the furnace, but I look out for my crews and every inch counts.


And shortening the chassis on the first loco opened up several cans of worms. I think I'll leave it long. (It'll give me room to model corrugated heat shields.)  Don

Little Critters, Pt.5

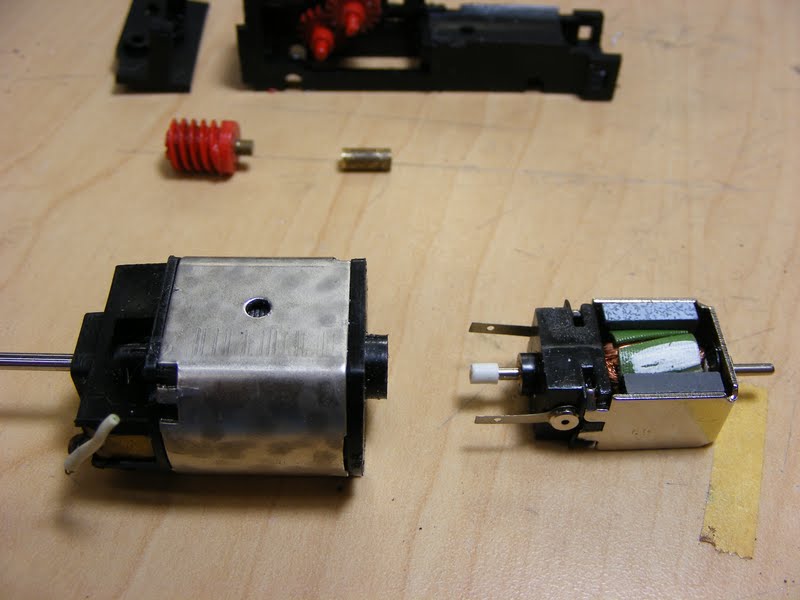
I wanted to at least try re-motoring this loco before giving up, so I ordered some off eBay that were listed as replacements for AHM switchers. I'm not sure which AHM switchers they are made for, but certainly not this one. But it is a nice little motor that ran well and quietly, and as long as I have a knife, a saw, and some glue I'm game to try anything. I began by completely dis-assembling the chassis; removing the wheel sets, unsoldering the electrical pickups, and opening up the gearbox. I cleaned all the dirt and goop off the gears and chassis. (I will have to re-apply goop before it is done, but it will be clean goop.)

The first problem to overcome was connecting the worm gear to the motor. The motor's shaft is smaller than the originals, and would not fit snugly in the worm. The first step was to glue an 1/16th" styrene tube to the shaft. The problem here was the inner diameter of the tube was smaller than the shaft. Using a drill bit only slightly larger than the tube's hole, I carefully reamed it out, letting the bit do the work of following the hole. I then used a succession of increasing diameter bits to enlarge the hole. I used a total of five bits to do the job, and even though I went slowly, letting the bits themselves find the channel, it still took six attempts to get one that didn't wobble on the shaft. This was the most time consuming part of this step. Now the motor shaft was too large for the hole in the worm gear, so I drilled it out to accept a 1/16th" brass tube. Finally I cut a short length of 1/8th" brass tube, which just happens to have an inner diameter of 1/16th". (Cutting the brass can easily be done with the Zona razor saws, but a cut-off wheel in my Dremel is faster.)


Here you can see how much smaller the new motor is.


Here I've attached the three pieces with some thickened super glue. ( From now on I will refer to any kind of super glue by the generic CA, for cyanoacrylate. For the record, I prefer the Zap line of CA's.)  If I was re-motoring a larger locomotive, I would use some more permanent method, but as this loco will only see moderate use for short distances, I feel this connection should hold up. (Notice I used the cut-off wheel to remove most of the rear shaft.)


To mount the motor level, I laminated some styrene strips, which I sanded to match the curve of the chassis, then attached it by screws from underneath. The final top piece of strip shimmed the motor to the correct height so the worm gear would mesh with the transmission.


The motor CA'd to the block. And yes, it did work. I ended up losing the rear attachment point, so I'll need to figure another way to anchor the deck to the chassis. Who wants to bet there's a magnet involved?


That's all for now. I hope this solution works, but if it doesn't, there may be another. Don

Friday, August 12, 2011

'Nother Critter, Pt.2

I have read about Tamiya body putty for a while now, about how hard it cures and doesn't shrink, and I've wanted to pick up a tube to try it out. But it seems the only place to get it was from a site in Hong Kong, and I was unwilling to give my info out of country. Last week however, I was checking eBay again, and found a seller in Indiana. Needless to say, I ordered a tube immediately. It came a few days ago, and I deserves its reputation. It dries rock hard and doesn't shrink at all. (My first application I put on too thick, and it took me forever to sand it down. I use it more sparingly now.) You can see how well it fills those small file marks at the front of the hood.


I trimmed the rear of the hood to more precisely fit the cab, and made a styrene patch to fill where the hood doesn't cover.


I used my dividers to mark a slot on this piece of 1/8th" styrene, then cut it out with a razor saw and knife. It sits perfectly in the opening.


I rounded over the edges and added a foot made of .015 strip.


I sanded off the molded in details on the cab and puttied the joints. Uh-oh, looks like I've got more puttying to do.


Actually I did a lot more puttying, but that will have to wait til next time.  Don

Speaking of Magnets


I've mentioned that I was also a wargamer, though I haven't done anything there for a few years. My main interest was in WWII gaming, and that is where I first started using magnets. However, I am a big fan of the Lord of the Rings, and when Games Workshop started releasing miniatures tied into the movie series, I had to pick some up. People love GW and people hate GW, but there is no denying they make excellent minis. One of my purchases was a Mordor Troll. One of the plus features of a GW mini is they give you plenty of parts to make a custom model, and the troll came with a selection of 3 heads, multiple arms, multiple weapons, and multiple armor. This model cost about $25 at the time, and while I could build the troll with any option I wanted, I felt it a waste so many other parts would go unused. But wait, what if I used tiny rare-earth magnets to make all the parts interchangeable?  Sooooooo......... that's what I did.


This is the model with all the parts. He has two left arms, but only one shield, so they're magnetized. Two breast plates also.He has two right arms, one with a permanently attached spear, the other able to accept three different hand weapons. And then there's the three ferocious heads.


Just three of the many poses available.


Something a little different for you to look at, I hope you don't mind.  Now back to the model railroading. Don

Wednesday, August 10, 2011

'Nother Critter, Pt.1

Was tempted to name this post Second Verse, Same as the First, but decided against it. I mentioned in an earlier post I ordered another AHM GE Center Cab loco, and it arrived yesterday. The very first thing I did was slap it on the test track. It worked much better than the first one, but I imagine if I find a re-motoring solution to the first one, I will apply it to this one as well. Pressing on. The first critter has a drastically shortened chassis, but it still sits as high as a standard switcher. In his excellent series of books (Steel Mill Railroads in Color---volume 2 just out, can't wait for 3), Stephen Timko features several locos whose cabs are even with the hoods, allowing them in very confined spaces. This was a look I wanted to capture.


I removed the cab and hoods from the deck.


Next I separated both hoods from the cab with a razor saw.


The air intakes on the short hood came off next. (They came damaged anyway, and yes I knew that before I bid on it.)


Now came time to remove all the molded-on details on the top. The grab irons on the front also disappeared. I sweetened the cut lines as much as possible with saws and sandpaper to get the tightest fit possible.


This is an after-market, thin-wall GE cab. It is really for larger, road units, but I think it works well here.


I plugged the holes, then reinforcing from the inside, glued the two hood sections together. You can also see where I took a tiny chisel knife and scooped a groove after the next-to-last access door. This allows the cab to easily slide over the hood.


Next up: I get to finally try some Tamiya putty to hide those seams. I'll see you then. Don