Sunday, November 27, 2011

Inspiration from an Old Friend, Pt.7

Back at the vines. I needed to anchor them to the wall in various places. I started by drilling small holes in the in the wall. Then I took loops of the 32 ga. wire, placed over the vine, then pushed both ends through the hole.


I left some slack in the vines so they could stand away from the wall. I pulled the loop taut.........


..........then fixed them in place from behind with a drop of CA.


Here are the four vines attached to the building. I left the top couple of inches free on the two left vines. (Did anyone notice I painted the cap tiles?)


I glued the smokestack to the small roof, drilled two holes on opposite sides, made two 'eyes' out of .015 brass wire and glued them in the holes. I made the guy wires out of the same brass wire, and anchored them to four holes drilled in the corners of the roof.


I painted the guy wires black, then twisted the two left vines around them. Time to add the foliage.


Three items needed to leaf out the vines: a cap full of full-strength Elmer's glue, a microbrush, and some fine, green ground foam.


Apply the glue liberally to the wires, trying to keep it off the walls. Sprinkle the ground foam on the glue.


I'm working up the wire. Where the vine is anchored to the wall by the loops, I applied the glue out onto the block. Sprinkle, let set a minute, then gently tap the excess foam off. There were some spots the foam didn't stick to, so keep applying the glue and sprinkling the foam.


Here are a few shots showing the vines after about five touch-up steps. I think they look pretty good. I also added the vent to the upper roof. I painted the inside of the smokestack 'oily black' and dry brushed the outside with the same. A few drops of black in a cap full of water gave me a 'wash' to stain the wall below the window. I also used it to weather the bottom of the corrugations on the awning, and dry brushed 'rust' on the tops of the corrugations


Still a few details to attend to, but I'd say this part of the project is 90% done. Now back to the center portion of the building.  Thanks for looking. Don

Friday, November 25, 2011

Inspiration from an Old Friend, Pt.6

Wow, it's been almost three months since my last entry. I didn't mean to be away this long, but pursuing other interests, a month-long illness, and a major case of  Don't Give a Damn took its toll. But I'm feeling better, and hope to be at the Workbench every day. I've been working on the kitbash the last couple of days, and hope to finish it up in the next week.

I moved from the main, middle roof to the two small roofs over the cement block addition. I wanted both of these to be tar and gravel covered.


In the past I would use 80 or 100 grit sandpaper to represent gravel roofs. The problem with sandpaper is it tends to curl up at the edges. This time I'd try gray N-scale ballast for the gravel, mixed with a little coal for contrast. I would use matt medium to fix it in place.


I tried several methods of applying the gravel, and found pinching it between my thumb and index finger gave the most even coverage. Then I saturated it with a pipette of the matt medium. After it had mostly dried, I applied more gravel in the thin spots, and set it with more medium.


This is what it looks like when dry. You can see there are still a few thinly covered spots. It took three applications to get it right.


Here you can see that I did the lower roof, plus had a big oops with the matt medium. I think some leafy vines should cover it nicely. I've made climbing vines before by simply gluing ground foam directly to the walls. Here I wanted to experiment by showing the vine itself in places, as well having it away from the wall in others. I need a wire armature.


I unspooled a few feet of  32 ga. wire, and looped it back and forth every six inches til I had 8-9 strands.


At one end, I twisted the bundle leaving some loops. These would represent the root ball. At the other end, I cut the wires flush.


I snipped the loops at their  bottoms, then twisted them into four 'roots.' CA drizzled on locks the wires together. I then carved the end of a .250" x .125" styrene strip to the shape shown.


I drilled a small hole and inserted the shortest bundle in it. The remaining three were draped over the end, with more CA applied.


I cut the 'root ball' off, then trimmed it some more to fit this corner.


I took two or three wires at a time, chucked them in my hand drill, then twisted them into four vines. Then off  to coat them in red primer.


While the primer dried, I added the mortar with a product called Robert's Mortar. Not sure I've gotten the hang of it yet, but after weathering it should look OK. Finally the wires were CA'ed to the wall.


That's it for now. Next time, I'll anchor the vines to the wall and add foliage. Til then.  Don

Tuesday, September 6, 2011

Inspiration from an Old Friend, Pt.5

We start with some unfinished business. Here is the picture of the base after masking from the last post. The second is after priming that I forgot to take last time. I also masked off the bottoms of all the walls, so I should have plenty of bare styrene to styrene  contact for solid glue joints.


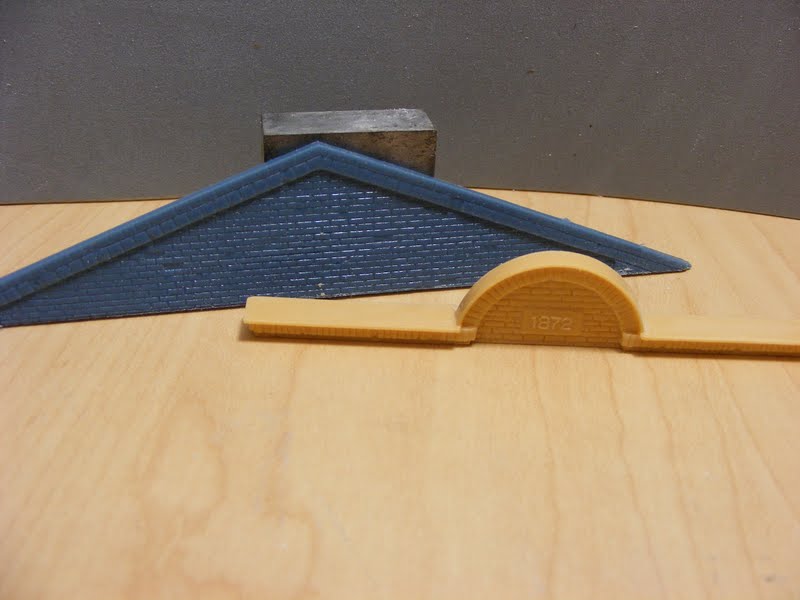
The yellow plastic was a cutoff  from the Weekly Herald kit that I used to make the railroad loading dock. I thought it would make a nice detail to the front wall. Unfortunately, the back of the piece had some ribs but no brickwork. The peaked wall from the Bakery kit was the perfect size to take care of that problem.


I removed the ribs from the back  and filed everything smooth. (The ribs were molded-in strips to register the placement of the front wall to the roof.)


I scribed the curved outline on the blue plastic.......


...............then rough cut it with a Dremel tool. A razor saw cut the straight lines, while a knife and file sweetened the curve.


Finally I glued the two together, and fine tuned the fit with a needle file, bringing the blue flush with the yellow.


To cover the seams, I wrapped the top with .010 x .250 styrene.


I let the glue dry overnight, then trimmed and filed the styrene flush with the brickwork. I then filed flat a section from the middle of the front wall. I haven't glued it down yet, but I think it will look nice.


Art had skylights on his building, and so will I. Here is the original roof with skylight, the window framework removed, and new angled skylight.


Art only used one, but I made a pair, meant to be used in tandem. Using scribed styrene sheet, I made two angled boxes, one taller that the other.


They are placed on the roof so the short one doesn't shadow the tall one. Speaking of the roof, well I finally have a roof. It is made from .040 smooth styrene, which I feel is thick enough to be self supporting. If any sagging starts to show, I won't hesitate to brace it.


I thought I might want to illuminate this as well  as the loading dock (which this sits over, so one bulb could do double-duty), so I cut out the roof under the skylights.


The roof needs access, so I built this stairway housing out of scribed styrene and a spare door. I did cut off the door's transom to lower it.


Some vents have also been added.


I wanted all the roof elements to be securely placed but not yet permanently attached. I drilled holes for the tubes glued to the bottom of the vents behind the skylights, and made platforms the fit the interiors of the other two vents and the stairwell.


OK, time to paint the window and door trim. Here is the loading dock masked off for the second time.


And this is the color I chose, only slightly darker than the kit's molded in green. Instead of going with a Polly-S railroad color, I used Vallejo Dark Green lightened with White and Bright Yellow.


I think it looks nice against the Conrail Blue of the building.


That's all for now. Next time I'll be working on more roof details, doing some painting, and we're pretty close to gluing all the walls together, so keep checking back. I hope you've enjoyed this project so far, and comments and questions are always welcome. Don

Friday, September 2, 2011

Inspiration from an Old Friend, Pt.4

I painted!  Let me be clear, I painted!  I reiterate,  I PAINTED!  I know, I can hardly believe it myself. Awwww, I'm jes funnin' y'all. No, I did paint, it's just not that big of an ordeal as I make it out to be. Usually the paint bench is covered in the over-flow of my other projects. If I need to set something down, and there's no place on the workbench, I just drop it on the pile on the paint bench.  (To paint, I had to move all the 'junk' to the mobile table. Not an ideal solution.)

As I said last time, I had reached the point where I had to paint before I could finish construction. Here is the base with steps and sidewalk attached. The masking tape covers where the walls will glue to the base. (I hate to scrape paint off flat surfaces to get a good glue joint.) Next I primed the whole base with dark gray Painter's Touch Primer by Rustoleum. White and  Red-Brown primers are also available from them. Modellers all have their favorite primers, and  these are the only ones I use. After the primer had dried, I masked around the steps and sidewalk. (I'm sorry, but I forgot to take pictures of this.)


Remember I was deciding which shade of blue to use? I went with a shade midway between them. The one kit's plastic was so dark, it almost didn't seem real. The other kit's was light enough to be blue-gray. This is Polly-S Conrail Blue. (Just a little lighter than Game's Workshop's Ultramarine Blue, which I would have used if I had a can left from my Space Marines fling.) I masked off everything but the brickwork.


Removing masking tape is a messy business. You want to remove the tape as soon as possible after spraying. I let the paint dry overnight before masking off everything but the bottom 'concrete' section.


The dock and rear wall together. The wall did not need any masking, except for some strips on the backside where it will be glued.


The front with Annex.


Leftover cement blocks and a fan from a kit window, and I've blocked up two windows. (There will be a smokestack rising there.)


Here you can see one of my goofs. There was a fair amount of paint bleed-under around the doors and vents. This is partly due to not burnishing the tape tight enough to the plastic, and partly to my impatience. I had finished painting the brickwork blue, and cleaned the airbrush, when I decided the trim on the new addition should be the same color blue. Instead of loading the airbrush up again, I decided to hand paint. The problem was I really loaded the brush and slathered it on. It wicked up under the tape. Had I used the airbrush, I wouldn't have had this problem at all. Oh well, a few minutes with a scribe and a chisel blade, and the evidence was mostly gone.


The back wall. I brush painted all the foundations, the stoop, and the steps with my choice of light gray to represent 'concrete.' Also notice the primered base.


The sidewalk on the end, it has some nice cracks in it which will show up after weathering. This was such a large piece that I sprayed it rather than brushing. (Actually, after brush painting all the foundations, I went back with the airbrush and carefully filled-in and evened-out.) Wooo, I need to install some stairs under that upper door before someone gets hurt.


The steps to the dock are 'concrete' too. The fan housing is flat aluminum.


Once the wall sections are glued to the base and to each other (and it won't be long), open joints like the one between the block and the brick will disappear.  The next major construction will be the roof for the center section. Another major consideration is what color to paint the window frames. The kit's are molded in a light green, which I kind of like. Plus, I don't want to stray too far from Art's vision.


OK, a little unfinished business. I never really showed the results of thinning the roof over the Annex, from the last post. Here are a couple of shots so you can judge if it was worth the effort.


That's all for now. Tune in next time to see my choice of green for the trim work. Thanks for looking. Don